1、这个功能是和随机预览文章的功能,点击一次更换一次文章
2、将下面的 PHP 代码加入到主题目录下:themes/zibll/functions.php 文件中。
3、添加完成之后访问:你的域名+/?random,然后可以自己添加在菜单里面
4、具体效果可以访问查看:https://www.llsns.com/?random
// 添加随便看看(BY www.llsns.com)
function random_postlite() {
global $wpdb;
$query = "SELECT ID FROM $wpdb->posts WHERE post_type = 'post' AND post_password = '' AND post_status = 'publish' ORDER BY RAND() LIMIT 1";
if ( isset( $_GET['random_cat_id'] ) ) {
$random_cat_id = (int) $_GET['random_cat_id'];
$query = "SELECT DISTINCT ID FROM $wpdb->posts AS p INNER JOIN $wpdb->term_relationships AS tr ON (p.ID = tr.object_id AND tr.term_taxonomy_id = $random_cat_id) INNER JOIN $wpdb->term_taxonomy AS tt ON(tr.term_taxonomy_id = tt.term_taxonomy_id AND taxonomy = 'category') WHERE post_type = 'post' AND post_password = '' AND post_status = 'publish' ORDER BY RAND() LIMIT 1";
}
if ( isset( $_GET['random_post_type'] ) ) {
$post_type = preg_replace( '|[^a-z]|i', '', $_GET['random_post_type'] );
$query = "SELECT ID FROM $wpdb->posts WHERE post_type = '$post_type' AND post_password = '' AND post_status = 'publish' ORDER BY RAND() LIMIT 1";
}
$random_id = $wpdb->get_var( $query );
wp_redirect( get_permalink( $random_id ) );
exit;
}
if ( isset( $_GET['random'] ) )
add_action( 'template_redirect', 'random_postlite' );
// 随便看看结束(BY www.llsns.com)1、关于这个网站复制自动添加版权和原文地址的这个功能之前我也有研究过,网站百度也有很多,但是基本上都是失效的,要么能用也只是在文字内复制之后会自动添加,但是代码质量的就不会自动添加,对于如果不懂 javascript 代码的朋友来说是很头疼的,因此社长也研究了优化一版,分享给大家使用。
方法一:
教程开始
1、添加核心 JS 代码
2、子比主题设置—>自定义代码—>自定义底部 HTML 代码:,添加以下代码:
3、其他主题自行添加在主题的 head 或 food 文件底部自行测试
<script type="text/javascript" src="https://cdnjs.cloudflare.com/ajax/libs/layui/2.6.8/layui.min.js"></script>
<script type="text/javascript">
/**网站内容复制自动添加版权声明和原文地址*/
$(document).on("copy", function(e) {
  var selected = window.getSelection();
  var selectedText = selected.toString().replace(/\n/g, "<br>");
  var copyFooter =
      "<br>-----------------------<br>著作权归作者所有。<br>" +
      "商业转载请联系作者获得授权,非商业转载请注明出处。<br>" +
      "作者:乐乐博客<br> 源地址:" +
      document.location.href +
      "<br>来源:乐乐博客<br>© 版权声明:本文为博主原创文章,转载请务必保留原文链接!";
  if (document.location.pathname === "/") {
    var copyFooter =
        "<br>-----------------------<br>" +
        "来源:乐乐博客<br> 源地址:" +
        document.location.href +
        "<br>© 版权声明:商业转载请联系作者获得授权,非商业转载请注明出处。<br>";
  }
  var msgContent =
      '<span style="font-weight: 700;margin: 0 !important;">【乐乐博客(www.LLsns.com)】<br>复制成功,若要转载请务必保留原文链接</span>' + copyFooter;
  layer.msg(msgContent, {
    time: 2000,
    shift: 2,
    shade: 0.3,
    skin: "wiiuii-layer-mode"
  });
  var copyHolder = $("<div>", {
    id: "temp",
    html: selectedText + copyFooter,
    style: {
      position: "absolute",
      left: "-99999px"
    }
  });
  $("body").append(copyHolder);
  selected.selectAllChildren(copyHolder[0]);
  window.setTimeout(function() {
    copyHolder.remove();
  }, 0);
});
</script>
2、添加 css 样式代码
1、子比主题设置->自定义代码->自定义 css 代码:,添加以下代码
/*layui 弹窗样式美化*/
.wiiuii-layer-mode{
background-image: linear-gradient(135deg, #f5f7fa 0%, #c3cfe2 100%);
border: none !important;
border-radius: 8px !important;
}
方法二:
1、将下面的 PHP 代码加入到主题目录下:themes/zibll/header.php文件中,
需要注意的是,需要放在代码放置在这里代码中间否则没用
2、其他主题同理,放置在 header.php 文件中,因为这个是全局引用文件
3、自行修改一下,文章来源出自 XXX 博客的文字内容即可
4、添加之后去赶快体验一下吧~如果教程有帮到你,,可以多推荐推荐乐乐博客哈
<!--复制内容自动添加原文地址开始 by 乐乐博客-->
<script type="text/javascript">

  function addLink() {

  var selection = window.getSelection();

  pagelink = "</br></br>. 文章来源出自[ 乐乐博客 ] 转载请保留原文链接: " + document.location.href;

  copytext = selection + pagelink;

  newdiv = document.createElement('div');

  newdiv.style.position = 'absolute';

  newdiv.style.left = '-99999px';

  document.body.appendChild(newdiv);

  newdiv.innerHTML = copytext;

  selection.selectAllChildren(newdiv);

  window.setTimeout(function () {

  document.body.removeChild(newdiv);

  }, 100);

  }

  document.oncopy = addLink;

</script>
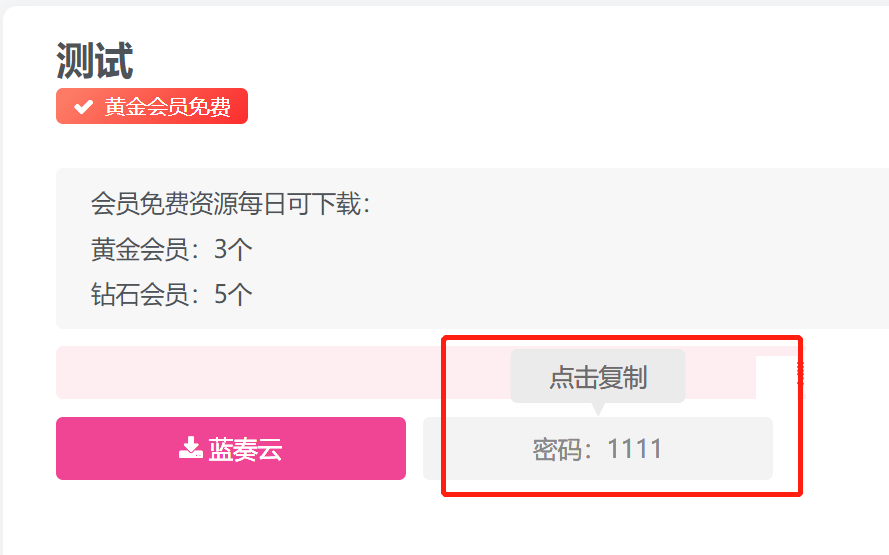
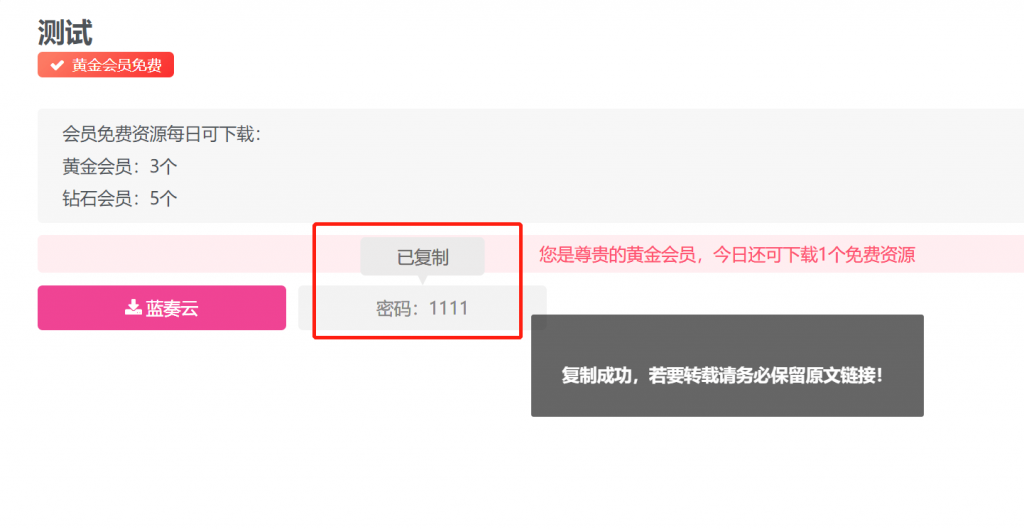
<!--复制内容自动添加原文地址结束 by 乐乐博客--> 因为自带的子比主题的独立下载页是没有复制按钮的,如果有提取码密码的话则需要人工复制一下密码,一来很麻烦二来也容易复制错,因此找到了这个一件复制的样式,分享给大家
教程分为两步,添加 css 样式和添加 js 代码即可如下
1.子比主题设置->自定义代码->自定义 CSS 样式:,添加以下 CSS 代码:
/*
 *by:乐乐博客 - www.llsns.com
 *子比主题下载页面一键复制提取码功能 css 样式开始
 *请本 CSS 代码放置子比主题设置->全局&功能->自定义 CSS 样式中即可
 */
.but-download .badg {
  position: relative;
  cursor:pointer;
}

.but-download .badg::after {
  position: absolute;
  content: " ";
  width: 0;
  height: 0;
  top: -11px;
  left: 50%;
  -webkit-transform: translateX(-50%);
     -moz-transform: translateX(-50%);
      -ms-transform: translateX(-50%);
       -o-transform: translateX(-50%);
          transform: translateX(-50%);
  border-top: 10px solid rgb(236, 235, 235);
  border-left: 5px solid transparent;
  border-right: 5px solid transparent;
  -webkit-transition: .3s;
  -o-transition: .3s;
  -moz-transition: .3s;
  transition: .3s;
  opacity: 0;
}

.but-download .badg::before {
  content: attr(data-before);
  position: absolute;
  width: 100px;
  height: 31px;
  top: -40px;
  left: 50%;
  -webkit-transform: translateX(-50%);
     -moz-transform: translateX(-50%);
      -ms-transform: translateX(-50%);
       -o-transform: translateX(-50%);
          transform: translateX(-50%);
  font-size: 14px;
  line-height: 31px;
  border-radius: 4px;
  color: #6c6a6a;
  background-color: rgb(236, 235, 235);
  text-align: center;
  -webkit-transition: .3s;
  -o-transition: .3s;
  -moz-transition: .3s;
  transition: .3s;
  opacity: 0;
}

.but-download .badg:hover::after,
.but-download .badg:hover::before {
  opacity: 1;
}
/*
 *by:乐乐博客 - www.llsns.com
 *子比主题下载页面一键复制提取码功能 css 样式结束
 */
2.子比主题设置->自定义代码->自定义 javascript 代码:,添加以下 javascript 代码:
/*
 *by:乐乐博客 - www.llsns.com
 *子比主题下载页面一键复制提取码功能 JavaScript 代码开始
 *请本 JavaScript 代码放置子比主题设置->全局&功能->自定义 javascript 代码中即可
 */
if(document.querySelectorAll(".but-download .badg")!=undefined){
     const reg = /[a-zA-z0-9]/ig;
    const copy1 = document.querySelectorAll(".but-download .badg");
    for (let i = 0; i < copy1.length; i++) {
      copy1[i].index = i;
      copy1[i].setAttribute("data-before", "点击复制");
      copy1[i].addEventListener("click", copyOperation);
      copy1[i].addEventListener("mouseout", copyOk);
    }

    function copyOperation() {
      var oInput = document.createElement("input");
      let text = this.innerText;
      text = text.match(reg).join("");
      oInput.value = text;
      document.body.appendChild(oInput);
      oInput.select();
      document.execCommand("Copy");
      oInput.className = "oInput";
      oInput.style.display = "none";
      this.setAttribute("data-before", "已复制");
    }
    function copyOk() {
      setTimeout(() => {
        this.setAttribute("data-before", "点击复制");
      }, 300)
    }
}
/*
 *子比主题下载页面一键复制提取码功能 JavaScript 代码结束
 *by:乐乐博客 - www.llsns.com
 */
效果图
这个安装教程就不过多赘述了,也很简单,所有的 JS 和 css 代码都集成在本地,没有外链调用
至于如果需要自己改颜色的话,查看代码当中的注释效果即可
1、在后台->外观->小工具->自定义 HTML-> 选择你需要放的位置社长是放在 首页-首页侧边栏
<!--时间进度效果小工具开始-->
 <style type="text/css">
      .time-schedule-main{/*background-color: white;*/border-radius: 8px;display: flex; justify-content: space-evenly; align-items: center;}.today-schedule,.toweek-schedule,.tomonth-schedule,.toyear-schedule{display: inline-block;width: 50px;height: 100px;background-color: white;border: 1px solid #eee;border-radius: 99px;}.mizhi-schedule-item{position: relative;width: 100%;height: 100%;overflow: hidden;border-radius: 99px;}.today-item,.toweek-item,.tomonth-item,.toyear-item{position: absolute;background-image: linear-gradient(to right, #a18cd1 0%, #fbc2eb 100%);width: 100%;height: 109%;bottom: 0;transition: all 1s;}.schedule-info{display: flex;color: #ff5991;position: absolute;margin: auto;top: 0;left: 0;right: 0;bottom: 0;flex-direction: column;align-items: center;justify-content: center;}.schedule-tilte{font-size: 12px;font-weight: 700;}.time-schedule-main img{background-repeat: no-repeat;max-width:unset !important;max-height:unset !important;width: 200px;height: 10px;top: 0;left: 0;position: absolute;animation: mizhi_move_wave 2s linear infinite;-webkit-animation: mizhi_move_wave 2s linear infinite;}@-webkit-keyframes mizhi_move_wave{0%{-webkit-transform: translateX(0)}50%{-webkit-transform: translateX(-25%)}100%{-webkit-transform: translateX(-50%)}}@keyframes mizhi_move_wave{0%{transform: translateX(0)}50%{transform: translateX(-25%)}100%{transform: translateX(-50%)}}
      /* 今日剩余背景颜色 */
      .today-item {
        background-image: linear-gradient(to right, #a18cd1 0%, #fbc2eb 100%);
      }
      /* 本周剩余背景颜色 */
      .toweek-item {
        background-image: linear-gradient(to right, #ff9a9e 0%, #fad0c4 100%);
      }
      /* 本月剩余背景颜色 */
      .tomonth-item {
        background-image: linear-gradient(to right, #fbc2eb 0%, #a6c1ee 100%);
      }
      /* 今年剩余背景颜色 */
      .toyear-item {
        background-image: linear-gradient(to right, #ffecd2 0%, #fcb69f 100%);
      }
    </style>
    <div class="time-schedule-main">
      <div class="today-schedule">
        <div class="mizhi-schedule-item">
          <div class="today-item">
            <img src="https://s4.ax1x.com/2022/02/06/HuOUv6.png">
          </div>
          <div class="schedule-info">
            <span class="schedule-tilte">今天仅剩</span>
            <span class="today-num">100%</span>
          </div>
        </div>
      </div>
      <div class="toweek-schedule">
        <div class="mizhi-schedule-item">
          <div class="toweek-item">
            <img src="https://s4.ax1x.com/2022/02/06/HuOUv6.png">
          </div>
          <div class="schedule-info">
            <span class="schedule-tilte">本周还有</span>
            <span class="toweek-num">100%</span>
          </div>
        </div>
      </div>
      <div class="tomonth-schedule">
        <div class="mizhi-schedule-item">
          <div class="tomonth-item">
            <img src="https://s4.ax1x.com/2022/02/06/HuOUv6.png">
          </div>
          <div class="schedule-info">
            <span class="schedule-tilte">本月剩余</span>
            <span class="tomonth-num">100%</span>
          </div>
        </div>
      </div>
      <div class="toyear-schedule">
        <div class="mizhi-schedule-item">
          <div class="toyear-item">
            <img src="https://s4.ax1x.com/2022/02/06/HuOUv6.png">
          </div>
          <div class="schedule-info">
            <span class="schedule-tilte">今年还剩</span>
            <span class="toyear-num">100%</span>
          </div>
        </div>
      </div>
    </div>

 <script type="text/javascript">
$(function () {
  $.extend({
    mizhiSchedule: function () {
      var a = new Date(),
        e = 3600 * a.getHours() + 60 * a.getMinutes() + a.getSeconds(),
        c = e / 86400,
        b = (100 - 100 * c).toFixed(1);
      c = (109 - 109 * c).toFixed(2);
      $(".today-num").text(b + "%");
      $(".today-item").css("height", c + "%");
      b = a.getDay();
      0 === b && (b = 7);
      c = (e + 86400 * (b - 1)) / 604800;
      b = (100 - 100 * c).toFixed(1);
      c = (109 - 109 * c).toFixed(2);
      $(".toweek-num").text(b + "%");
      $(".toweek-item").css("height", c + "%");
      b = a.getFullYear();
      c = a.getMonth();
      a = a.getDate();
      var d = new Date(b, c + 1, 0).getDate();
      d = (e + 86400 * (a - 1)) / (86400 * d);
      var f = (100 - 100 * d).toFixed(1);
      (109 - 109 * d).toFixed(2);
      $(".tomonth-num").text(f + "%");
      $(".tomonth-item").css("height", f + "%");
      d = 0;
      f = [
        31,
        (0 == b % 4 && 0 != b % 100) || 0 == b % 400 ? 29 : 28,
        31,
        30,
        31,
        30,
        31,
        31,
        30,
        31,
        30,
        31
      ];
      for (var g = 0; g < c; g++) d += f[g];
      a =
        (e + 86400 * (d + a - 1)) /
        (86400 * ((0 == b % 4 && 0 != b % 100) || 0 == b % 400 ? 366 : 365));
      e = (100 - 100 * a).toFixed(1);
      a = (109 - 109 * a).toFixed(2);
      $(".toyear-num").text(e + "%");
      $(".toyear-item").css("height", a + "%");
    }
  });
  $.mizhiSchedule();
  setInterval($.mizhiSchedule, 2e3);

});

    </script>
<!--乐乐博客 - www.llsns.com 时间进度效果小工具结束-->
效果图:
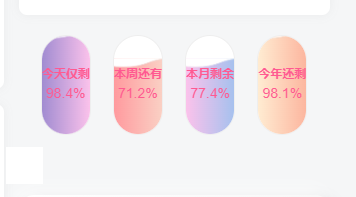
这个功能是从 ripro 的主题里面衍生过来,觉得挺好看,就拿过来优化适配了一下,具体效果可以参考本站,安装起来也很简单,不需要再 PHP 中修改,直接在外观小工具里面实现。
安装方法
1、在后台->外观->小工具->自定义 HTML-> 选择你需要放的位置社长是放在 首页-首页侧边栏添加下方代码
如果觉得代码太长,可以将下面的 css 样式中的首页最新发布标题里面 css 样式代码,复制下来,放到一个 css 文件当中再引用即可,
引用代码可参考我提供的,将/css/news.css 更改成你的文件路径就可以了
<link rel='stylesheet' id='ripro_chlid_style-css' href='/css/news.css' type='text/css' media='all' />效果图

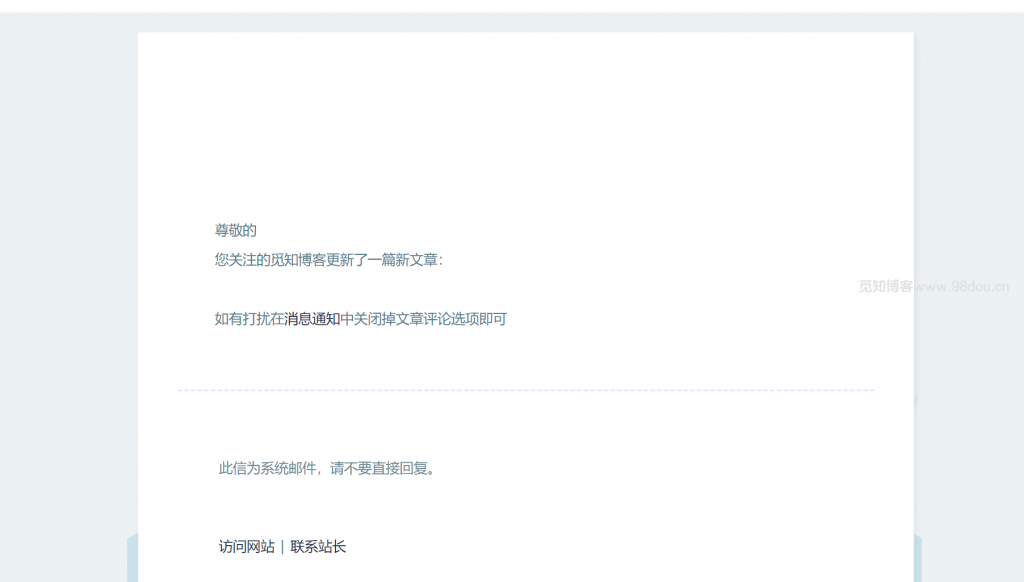
这个功能的话算上一个激活老用户的功能吧,如非必要可以不用,因为如果你的网站注册用户比较多,我是不建议使用的,因为代码会执行你数据库下的所有用户邮箱进行发送,可能会操作服务器堵塞。具体效果应该有朋友昨天收到了我的测试邮件哈哈,
1、只需将下面的 PHP 代码加入到主题目录下:themes/zibll/functions.php 文件中。
2、然后把里面的链接网站改成你自己的就可以了
预览邮件发送效果
这个功能我还是很喜欢的因为前两天网站搬家,我检查了一下 uploads 图片文件夹,光图片就已经占用半个服务器空间,因此有了这个文章删除时自动删掉图片附件还是很香的,可以很大程度减缓服务器压力和时间成本
1、只需将下面的 PHP 代码加入到主题目录下:themes/zibll/functions.php 文件底部就可以了。


![zibll子比主题-网址导航、友情链接页面创建教程[V8新功能]-老六资源网](https://llsns.com/wp-content/uploads/2025/01/5.webp)




- 最新
- 最热
只看作者